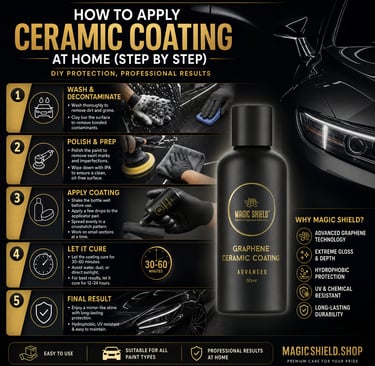
How to Apply Ceramic Coating at Home (Step by Step)
Learn how to apply ceramic coating at home with our beginner-friendly step-by-step guide. Get pro results with the right tools from magicshield.shop.
CERAMIC COATING
6/14/20266 min read
If you’ve ever stared at your car after a fresh wash and thought, “I wish it always looked this good”, ceramic coating is basically your answer. Once, it was mostly a luxury thing for pro detailers and those exotic car folks, but today ceramic coating is more available, even for regular car lovers who want to protect their paint at home. So what do you get? A kind of showroom shine that hangs around for years , not just a couple of weeks.
In this full guide, we’re going to go through how to apply ceramic coating at home, from the very first wash all the way to the final cure. No matter if you’re in the USA, Australia, Canada, or the UK, this step-by-step walkthrough will help you reach results that look professional without paying professional-level prices—especially when you pick the right products at magicshield.shop.
Alright, let’s get into it.
What even Is Ceramic Coating, and Why should Your Car Have It?
Ceramic coating is a liquid polymer that chemically bonds to your vehicle’s factory paint, leaving behind a tough, water-repelling protective layer. And unlike older school waxes or typical sealants, ceramic coating doesn’t simply disappear after a few weeks. It actually integrates into the paint surface and helps with a bunch of stuff like:
Protection that lasts — solid coatings often go 2–5 years or even beyond
Water-shedding, hydrophobic vibe — water beads up and then rolls off, lifting grime along with it
UV resistance — helps stop paint oxidation and fading
Chemical resistance — pushes back bird droppings, tree sap, road fallout and other nasty debris
Better gloss — makes color look richer and reflections pop more
Simpler upkeep — your car tends to stay cleaner longer between washes
The bottom line is this: if you care about your paint and you want to keep your car’s value, ceramic coating is one of the smartest investments you can make.
Tools and Materials You’ll Need
Before you start, gather everything, really. Running out of supplies mid-application is… not great for you, like, it’s a disaster waiting to happen. Here’s your full shopping list, with all that kind of stuff:
Ceramic Coating Supplies:
Ceramic coating kit (coating, applicator blocks, suede applicator cloths)
High-quality microfiber towels (multiple—at least 10–15)
Panel wipe / IPA (isopropyl alcohol) solution
Paint Preparation Supplies:
pH-neutral car shampoo
Iron remover / fallout remover spray
Clay bar kit (clay bar + clay lubricant)
Dual-action polisher and polish compound (only if paint correction is needed)
Foam cannon or wash mitt
Environment & Safety:
Nitrile gloves
Safety glasses
Clean enclosed garage or a shaded workspace
Good lighting (LED work light recommended, don’t skip this)
Masking tape
All of these can be found in one place, somehow. magicshield.shop stocks everything from ceramic coating kits and clay bar treatments to iron removers, microfiber towels, and detailing accessories. Car owners across the USA, Australia, Canada, and the UK use magicshield.shop for quality DIY detailing products at competitive prices , because it just makes life easier.
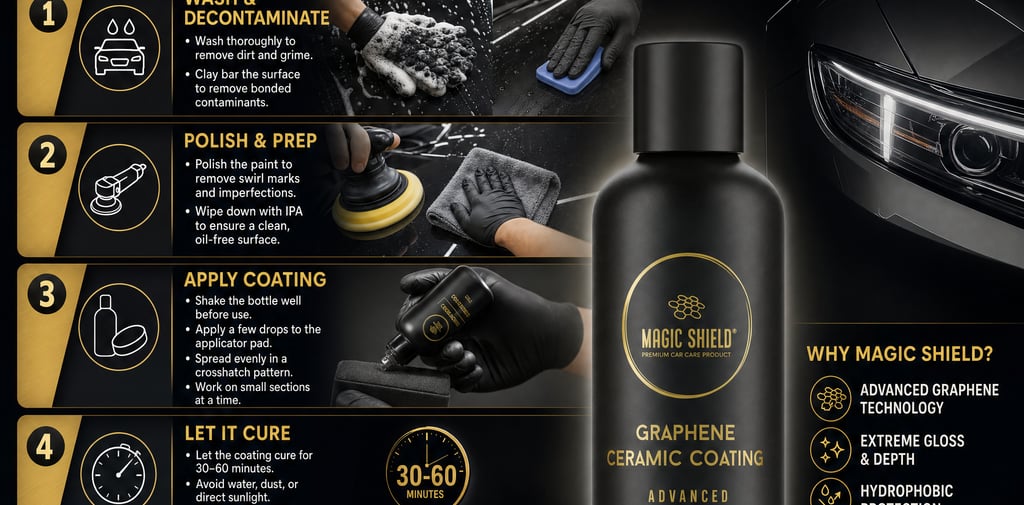
Step 1: Wash the Vehicle Thoroughly
The main rule for ceramic coating is simple, but it matters a lot: the surface has to be perfectly clean. If there’s dirt, grease, or any contamination under the coating it’ll get sealed in like, permanently.
Start with a two bucket wash method, pH-neutral car shampoo. Wash from top to bottom, rinse well, then dry with a clean microfiber drying towel. Try to avoid automatic car washes, those brushes can bring in micro scratches and other nasties, even when they “look” clean.
Pro Tip: do the wheels and wheel arches separately , so you don’t cross-contaminate your paint with brake dust.
Step 2 Iron remover and fallout stuff
Even after a really thorough wash, your paint probably still has embedded iron particles from brake dust and road grime, you know the kind that you just can’t really see. If you leave it like that, it can mess with the paint finish over time, kinda quietly but still.
Spray an iron remover (sometimes it’s called fallout remover) over all the painted areas and let it sit for, like 3–5 minutes. You’ll notice it turning purple as it reacts with that hidden iron. Then rinse it out very well , no skipping.
The iron remover sprays from magicshield.shop are made to be safe on paint, wheels, and trim, so they work well when you want a full decontamination session before you move on to any coating.
Related read: How Iron Remover Works and Why You Need It Before Detailing
Step 3 Clay bar treatment
Even after iron removal, you can still be dealing with bonded surface gunk— industrial fallout, tar spots, and that road film that kinda clings. Try this: run your fingertip across a dry panel after washing. If it feels rough, like tiny sandpaper, then yeah, you need to clay.
How to clay bar your car, basically:
Use clay lube spray to lubricate the panel
Slide the clay bar gently across the surface using straight, back-and-forth strokes
Fold and knead the clay often, so you always have a fresh section
Wipe the panel with a clean microfiber towel
Do the same across all painted surfaces
After claying the paint should feel smooth, like glass. Honestly this step isn’t optional if you’re aiming for a ceramic coating.
Related read: Complete Clay Bar Treatment Guide for Beginners | Best Clay Bar Kits for Car Detailing
Grab a clay bar kit from magicshield.shop. It comes with clay, lubricant, and clear usage instructions, so you don’t have to guess what goes where.
Professional Tips for Better Results
Try working at night or in a garage with lighting you can control—sun light really messes with your eyes, it makes it tough to see high spots and those missed little areas.
Do a test section first, like apply it to a small hidden panel so you get a feel for the flash time.
Use LED inspection lights too — they show basically every streak, high point, and smear before the coating really locks in.
Coat your trim and glass as well , a lot of ceramic coatings are safe for glass , plastic trim, and wheel surfaces.
Go for layering — some formulas let you apply a second coat after 1–4 hours, for better shielding not just a faster-looking finish.
Keep a spare bottle of IPA close by, so you can wipe up accidental drips or smudges before they cure, like right away
Common Mistakes to Avoid
Knowing what not to do is kinda as important as knowing the right technique.
Skipping paint prep—ceramic coating kind of seals in every imperfection, plus any leftover contamination.
Working in direct sunlight — it leads to uneven flash timing and those annoying streaks.
Applying too much product — more is not the goal. Thin, even layers usually perform way better.
Buffing too early or too late — the flash window is critical; buff too soon and you can remove the coating, buff too late and you end up battling high spots.
Using the wrong towels—always stick to clean, high quality microfiber. The ones from magicshield.shop are specifically set up for coating tasks.
Not wearing gloves — fingerprint oils can cause bonding problems later, and then you just chase issues.
Rushing the process — slow down. A solid DIY ceramic coating job can take an entire day, or sometimes even a weekend.
🛒 Strong Call to Action
Transform Your Car's Paint — Starting Today.
Don't let your paint fade, oxidize, or collect scratches for another season. Everything you need to apply ceramic coating at home — kits, clay bars, iron remover, microfiber towels, and more — is available right now at magicshield.shop.
✅ Complete DIY ceramic coating kits ✅ Professional-grade decontamination products ✅ Fast shipping to USA ✅ Trusted by thousands of car enthusiasts
Frequently asked questions
Can I really slap ceramic coating on at home, with no real professional training?
Yeah, most people can. The newer DIY ceramic coating kits are built for normal garage use, and they include pretty detailed instructions . But the whole thing kinda lives or dies by the prep, like washing it clean , doing decontamination, and fixing the paint surface before you even start to apply. If you go slow, and you use the right stuff from magicshield.shop, you can still land results that look pretty close to professional.
How long will ceramic coating last if I do it at home?
Usually a DIY ceramic coating, when it’s applied properly, can last about 2–4 years. It really depends on the product, how careful you were with the surface prep, and what kind of care you do after. Some folks also use a ceramic booster spray every few months, and that can help stretch the service life.
Do I have to polish my car before applying ceramic coating?
Not always. If your paint is already looking straight, with no obvious swirls, scratches, or stubborn water spots, then you can skip the polishing step. But if those issues are there, you should take care of them first. Because ceramic coating doesn’t really “erase” imperfections, it more like seals them in, and that’s why correction matters. If your paint is in decent shape, just do an IPA wipe-down and you’re good to go.
What temperature is best for ceramic coating at home?
Aim for something like 60–80°F (15–27°C), and keep humidity low-ish, because that affects curing and flash times. Also avoid direct sun , very cold conditions, or high humidity . Those environments can mess with how evenly it bonds, and then the finish won’t come out as clean as it should.
Help
Questions? Reach out anytime, we're here.
Links
Subscribe for latest offers
info@magicautocare.shop
© 2026. All rights reserved.
Contact Us